The best oval diamond ratio is 1.35:1 to 1.50:1 for length-to-width — but that single number tells you roughly 20% of what you need to know to select a well-cut oval. The remaining 80% is depth percentage, table percentage, girdle thickness, symmetry grade, and the prong configuration that will actually hold the stone securely. Unlike round brilliants, ovals receive no GIA cut grade. That means the entire burden of evaluating cut quality falls on you as the buyer — and the retailers are not going to tell you which stones to avoid. This guide gives you every number, every threshold, and the two named proportions concepts that explain why most oval buyers unknowingly leave visible size and brilliance on the table.
Ideal oval diamond proportions: L:W ratio 1.35–1.50:1, depth 58–63%, table 53–63%, girdle Thin to Slightly Thick, culet None, symmetry Very Good or Excellent, polish Very Good or Excellent. For elongated ovals (1.50:1+), choose a 6-prong setting. Every number outside these ranges costs you either visible size, brilliance, or structural security — sometimes all three.
Most buyers filter by color and clarity and accept whatever proportions come attached. But a G-VS2 oval at 68% depth and 1.62:1 L:W is not the same diamond as a G-VS2 oval at 61% depth and 1.42:1 — even if the certificates look identical and the prices are similar. The deeper stone can have up to 25% less face-up area than the shallower one at the same carat weight. No GIA cut grade alerts you to this. The proportions you ignore are the ones that determine whether you love or merely tolerate your oval diamond.
TL;DR
- Best L:W ratio: 1.35:1–1.50:1 for most buyers. Below 1.30:1 is too round; above 1.55:1 bowtie risk increases significantly
- Ideal depth %: 58%–63%. Deeper than 65% creates the Proportions Penalty — significant face-up area loss at same carat weight
- Ideal table %: 53%–63%. Outside this range reduces either light return or crown facet performance
- GIA cut grade: Does NOT exist for ovals — you must evaluate proportions manually from the certificate
- Girdle: Thin to Slightly Thick. Extremely Thin = chipping risk; Extremely Thick = wasted carat weight
- Symmetry/Polish: Very Good or Excellent minimum. Good symmetry on an oval is visible to the naked eye
- 6-prong advantage: For ovals at 1.40:1 L:W and above, 6 prongs distribute holding force across the stone's belly curves and reduce rotation risk vs 4-prong
- Price benchmark: 1ct G-VS2 GIA oval from $2,887 on Blue Nile with ideal proportions available in stock


About This Guide
I am Farzana Hasan, GIA Expert and Lead Critic at Diamond Critics. The GIA cut grade gap for ovals is the single biggest information asymmetry in the diamond market. Every round diamond buyer gets a one-word cut summary — Excellent, Very Good, Good. Every oval diamond buyer gets nothing. They receive a certificate listing nine separate measurements and must either know what those numbers mean or buy blind.
This guide translates those nine numbers into actionable decisions. Every threshold here is derived from measurable geometric and optical outcomes, not opinion. I have seen buyers pay $4,000 for an oval with 70% depth and wonder why it looks smaller than their friend's $2,500 oval — this guide explains exactly why that happens and how to avoid it. All prices are live July 2026 Blue Nile data, GIA certified, natural diamonds.
For the complete oval buying framework including color and clarity, see the oval cut diamond guide. For how proportions interact with the bowtie effect, see the oval diamond bow tie guide.
The Proportions Penalty
Every oval diamond that exceeds ideal depth percentage carries what I call The Proportions Penalty: a systematic, measurable reduction in face-up area relative to what the same carat weight could deliver at ideal depth. This penalty is invisible on the certificate — the stone still says 1.00ct — but it is immediately visible in the mm dimensions.
The Proportions Penalty in numbers at 1ct:
| Depth % | Approximate Dimensions | Face-Up Area | Loss vs Ideal |
|---|---|---|---|
| 55% (Too Shallow) | 9.5 × 6.8mm | 50.6mm² | Windowing, no penalty on size |
| 58% (Ideal Low) | 9.2 × 6.6mm | 47.7mm² | Baseline |
| 61% (Ideal Mid) | 9.0 × 6.4mm | 45.2mm² | –5% vs shallow (acceptable tradeoff for brilliance) |
| 63% (Ideal High) | 8.8 × 6.3mm | 43.5mm² | –9% vs shallow (still within ideal) |
| 66% (Marginal) | 8.5 × 6.1mm | 40.7mm² | –15% vs ideal mid |
| 68% (Avoid) | 8.2 × 5.9mm | 38.0mm² | –22% vs ideal mid |
| 70% (Reject) | 7.9 × 5.6mm | 34.7mm² | –31% vs ideal mid — round-sized face-up at oval price |
A 1ct oval at 70% depth has the face-up area of a 0.75ct oval at ideal depth. You paid for 1ct and got 0.75ct worth of visible stone. That is The Proportions Penalty.
Why cutters produce deep ovals: Rough diamond crystals have irregular shapes. Cutting a shallow oval (58–61% depth) from irregular rough wastes more crystal than cutting a deep oval (67–70%). The deeper cut preserves carat weight and maximises the cutter's yield per piece of rough. It also inflates the certificate carat weight, making the stone appear larger on paper while being smaller on the hand. The GIA certificate does not flag this as a problem. Buyers who do not check depth percentage pay the penalty.
The Proportions Penalty is irreversible. Unlike clarity characteristics that can sometimes be improved by recutting, a deep oval cannot be re-cut to ideal depth without losing significant carat weight. You are buying the proportions as-cut. Filter depth before you buy.
The 6-Prong Advantage
A standard 4-prong oval setting places two prongs at the tips (the pointed ends of the long axis) and two prongs on the belly (the widest points of the short axis). This configuration holds the stone but creates a mechanical leverage problem for elongated ovals: the long axis acts as a lever arm, and any lateral force on the stone concentrates stress at just two belly prong contact points.
The 6-Prong Advantage adds two additional prongs at the belly midpoints between the existing four, creating six contact zones that distribute the holding force more evenly around the stone's elliptical perimeter. The result:
- Rotation resistance: A 4-prong oval can rotate in the setting over time as the prongs wear; 6 prongs reduce the mechanical advantage that enables rotation
- Even stress distribution: For elongated ovals (1.50:1+), the long tips create significant torque. Six prongs reduce peak stress at any single contact point by approximately 33%
- Tip protection: Most 6-prong oval settings include a prong at or near each tip, protecting the highest-risk chip points
- Security for larger stones: At 2ct+, the increased mass amplifies the leverage effect. Six prongs are standard practice for large oval solitaires among experienced jewellers
When 4-prong is acceptable: For compact ovals below 1.35:1 L:W, the stone is wide and short enough that the leverage disadvantage is minimal. A 4-prong setting at 1.30:1 L:W has significantly less torque than the same setting at 1.55:1. Below 1.35:1, 4-prong is a legitimate choice. Above 1.40:1, consider 6-prong. Above 1.50:1, strongly recommend 6-prong.
Farzana's Expert Take: I see 4-prong ovals set at 1.55:1 L:W and think about what happens to that stone over five years of daily wear. The two belly prongs holding an elongated oval experience the same total force as the four prongs of a 6-prong setting — concentrated into half the contact area. That is why elongated oval buyers should treat 6-prong as the security default, not a premium upgrade. It is available at the same price tier as 4-prong and costs nothing extra to request.
L:W Ratio: The Primary Proportion Decision
The length-to-width ratio is the proportion that most directly shapes the oval's visual character and finger-elongation effect. It is calculated from the GIA certificate measurements: divide length by width.
L:W ratio categories and what they produce:
| L:W Range | Category | Visual Character | Bowtie Risk | Best For |
|---|---|---|---|---|
| Below 1.25:1 | Round-like | Nearly circular, minimal oval identity | Very Low | Buyers who want hint of oval only |
| 1.25:1–1.35:1 | Compact | Wide, short oval, rounded silhouette | Low | Wide fingers, near-round preference |
| 1.35:1–1.50:1 | Standard | Classic oval, balanced elongation | Low-Moderate | Most buyers, most fingers |
| 1.50:1–1.60:1 | Elongated | Noticeable elongation, strong finger effect | Moderate-High | Buyers wanting maximum length |
| 1.60:1–1.70:1 | Very Elongated | Dramatic, fashion-forward | High | Style-specific choice only |
| Above 1.70:1 | Extreme | Approaches marquise territory | Very High | Avoid unless intentional |
The 1.35:1–1.50:1 sweet spot delivers the visual oval diamond identity most buyers picture — clearly elongated, clearly not round, with the finger-lengthening effect that makes ovals so popular in engagement rings. Within this range, the L:W choice is a style preference with no performance tradeoff.
How to read L:W ratio from a certificate:
- GIA certificate shows: "8.97 × 6.43 × 3.91mm"
- L:W ratio = 8.97 ÷ 6.43 = 1.39:1
- This is standard range — ✓
Blue Nile's product pages display the calculated L:W ratio on each stone listing. You do not need to calculate manually, but verifying from the certificate is good practice.
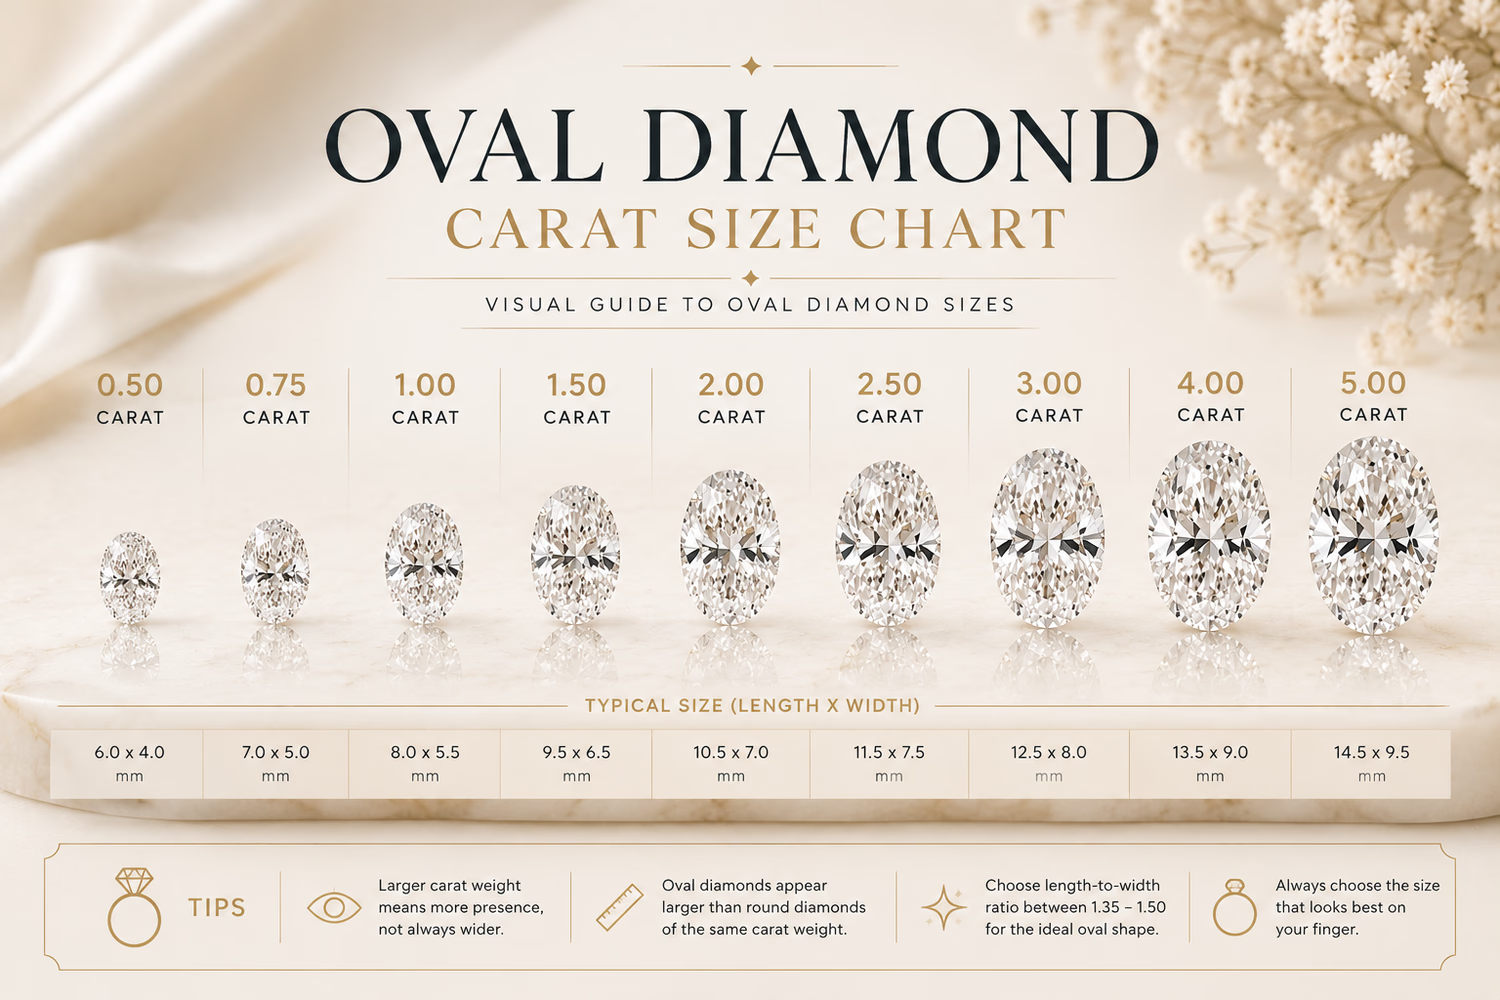
For a deeper comparison of how different L:W ratios appear on the hand with actual mm dimensions at each carat weight, the oval diamond size chart guide covers this in full detail.
Depth Percentage: The Hidden Size Killer
Depth percentage is the proportion that most buyers ignore and most cutters exploit. It is defined as: depth ÷ width × 100. A stone with 9.0mm width and 5.4mm depth has 60% depth.
Ideal depth range for ovals: 58%–63%
This range balances three competing requirements:
- Face-up size: Shallower stones spread the carat weight over more face-up area
- Light return: Stones too shallow (below 55%) allow light to pass through the pavilion without reflecting back — the "windowing" effect where you can see through the stone
- Structural integrity: The pavilion facets need sufficient depth to meet at proper angles for the stone to generate brilliance
What happens outside the ideal range:
Below 55%: The stone looks large face-up but dark at the centre (windowing). Light falls through the pavilion rather than reflecting back through the table. The stone appears lifeless even at good colour.
55%–58%: Borderline acceptable. Some windowing in certain lighting. Worth evaluating on 360° video before purchase.
58%–63%: Ideal. Optimal balance of face-up size and light return. This is the target for every oval diamond purchase.
63%–65%: Slightly deep but acceptable if other proportions are good. Face-up area begins to shrink but brilliance is maintained.
Above 65%: The Proportions Penalty begins. Each percentage point above 65% costs approximately 2–3% of face-up area. At 68% depth, you have lost a stone size tier. Reject.
Above 70%: Significant size loss. The face-up area approaches that of a round diamond at the same carat weight, eliminating the core reason to buy an oval.
Depth % is reported on the GIA certificate. It appears as a percentage in the proportions section. Filter this first before evaluating anything else.
Table Percentage: The Brilliance Window
Table percentage measures the largest flat facet on top of the diamond as a percentage of the stone's average width. For ovals: table ÷ width × 100.
Ideal table range for ovals: 53%–63%
The table facet is the primary entry and exit point for light. Too small a table and light enters through the crown facets at angles that produce internal reflections before exiting — good for fire (coloured dispersion) but reduces brightness. Too large a table and the stone looks glassy from above because the table dominates the face-up view.
Table % guide for ovals:
| Table % | Assessment | Effect |
|---|---|---|
| Below 50% | Too small | Reduced brightness, strong fire, antique look |
| 50%–53% | Borderline | Acceptable for vintage-style cuts |
| 53%–58% | Ideal low | Balanced brightness and fire |
| 58%–63% | Ideal | Maximum brilliance for modern oval |
| 63%–66% | Borderline | Slight glassiness but acceptable |
| Above 66% | Too large | Glassy table appearance, reduced crown fire |
The table % interacts with depth %. The ideal combination is depth 58–63% paired with table 53–63%. Outside these paired ranges, the stone loses either size or brilliance — or both.
Table vs depth priority: If forced to choose between a stone with ideal depth and marginal table vs ideal table and marginal depth, prioritise depth. Depth determines face-up size, which is the primary visual outcome. Table affects brilliance quality but within a wider acceptable range than depth.
Girdle Thickness: The Hidden Carat Trap
The girdle is the thin band running around the perimeter of the diamond at its widest point — where the crown meets the pavilion. GIA reports girdle thickness in a range (e.g., "Thin to Medium" or "Medium to Thick").
Ideal girdle for ovals: Thin to Slightly Thick (reported as Thin to Medium on GIA)
Why girdle thickness matters:
- Extremely Thin: Chipping risk at the girdle edge, especially at the tips of the long axis where the oval diamond is most structurally vulnerable. Avoid any oval with Extremely Thin girdle at the tips.
- Thin to Slightly Thick: The ideal range. Enough structural thickness to prevent chipping, not so thick it adds weight without adding face-up size.
- Thick to Very Thick: The girdle adds carat weight that contributes nothing to the face-up appearance. A Very Thick girdle can add 5–8% to carat weight without adding visible size — you pay for carat weight that is hidden in the setting.
- Extremely Thick: Avoid. Significant wasted weight.
GIA reports girdle thickness on the certificate. Check that it falls within Thin to Slightly Thick before purchasing. This check takes 10 seconds and is overlooked by most buyers.
Symmetry and Polish: The Execution Standards
GIA reports symmetry and polish separately for oval diamonds on a scale of Excellent, Very Good, Good, Fair, Poor.
Minimum standard: Very Good for both symmetry and polish
Symmetry in an oval context means the alignment of the long and short axes, the evenness of the belly curves on each side, and the regularity of the facet pattern. Poor symmetry in an oval is visible to the naked eye — the stone looks lopsided or uneven when viewed from above. Very Good and Excellent symmetry are both acceptable; Excellent is worth paying a modest premium for if buying 1.50ct+.
Polish affects surface smoothness. Polish defects (surface grain, abrasion marks) reduce the quality of light entering and exiting the stone. Very Good polish is imperceptible to the naked eye. Excellent polish is measurably better under loupe but practically equivalent for most engagement ring buyers.
Good symmetry: consider carefully. Good symmetry (one level below Very Good) is visible in some ovals — an uneven belly, a slightly off-centre table, or asymmetric tip sharpness. Evaluate the 360° video carefully on any oval with Good symmetry before purchasing. For ovals at 1.40:1+, Good symmetry is more visible than at compact ratios because the elongated shape amplifies any asymmetry.
The Complete Oval Proportions Checklist
Use this checklist against the GIA certificate and Blue Nile stone details for every oval you consider:
Non-negotiable (reject if outside range):
- ☐ Depth %: 58%–63%
- ☐ Girdle: Thin to Slightly Thick (not Extremely Thin, not Very Thick or Extremely Thick)
- ☐ Culet: None or Pointed (a large culet is visible face-up in an oval)
- ☐ Polish: Very Good or Excellent
Important (flag if outside, evaluate carefully):
- ☐ L:W ratio: 1.35:1–1.50:1 for standard; outside this, verify it matches your aesthetic intent
- ☐ Table %: 53%–63%
- ☐ Symmetry: Very Good or Excellent (not Good)
- ☐ Depth % between 63%–65%: Acceptable if face-up dimensions confirm adequate size
Video evaluation (always required):
- ☐ Watch 360° video for bowtie severity at chosen L:W ratio
- ☐ Confirm face-up stone shows even light return across both ends
- ☐ Verify belly symmetry from face-up view
What GIA Actually Reports for Oval Diamonds
This is the most important thing most oval buyers do not know: GIA does not assign an overall Cut grade to oval diamonds. The GIA cut grade system — Excellent, Very Good, Good, Fair, Poor — applies only to standard round brilliant cuts.
For oval diamonds, GIA reports:
- Measurements (length × width × depth in mm)
- Depth % (calculated)
- Table % (measured)
- Girdle (description range, e.g., "Thin to Medium")
- Culet (None, Pointed, Small, etc.)
- Polish (grade scale)
- Symmetry (grade scale)
- Fluorescence
- Colour and Clarity grades
There is no "GIA Excellent Oval." When Blue Nile labels oval diamonds as "Ideal Cut" in their filter, this is Blue Nile's proprietary designation based on their own depth, table, and symmetry thresholds — not a GIA grade. This designation is useful as a first filter but does not replace manual verification of the proportions above.
The practical implication: Always pull up the certificate and verify depth %, table %, girdle, symmetry, and polish yourself. Do not rely on "Ideal" or "Excellent" cut labels from any retailer for oval diamonds. The GIA report number on Blue Nile's listing links directly to the GIA certificate — verify it before buying.
Proportions by L:W Ratio: What Changes
Ideal proportions are not entirely static across L:W ratios. Some adjustments apply:
Compact ovals (1.25:1–1.35:1):
- Depth: 58%–62% (slightly tighter — compact ovals need shallower depth to show size advantage)
- Table: 55%–63%
- Bowtie: Minimal concern
- Prong count: 4-prong acceptable
Standard ovals (1.35:1–1.50:1):
- Depth: 58%–63% (full ideal range)
- Table: 53%–63%
- Bowtie: Evaluate in video for ratios approaching 1.50:1
- Prong count: 4-prong or 6-prong
Elongated ovals (1.50:1–1.65:1):
- Depth: 58%–62% preferred (slightly shallower preferred to maximise face-up length)
- Table: 53%–60% (slightly smaller table preferred to reduce glassiness at elongated ratios)
- Bowtie: Mandatory video evaluation
- Prong count: 6-prong strongly recommended
Tides Of Summer Capsule
Up To 30% Off
Shop The Sale →Vault ClearanceClear The Vault
Up To 70% Off
Shop Vault Deals →Affiliate link — no extra cost to you
4-Prong vs 6-Prong Settings: The Full Comparison
The prong configuration for oval diamond settings directly interacts with the L:W ratio choice. Here is the full comparison:
| Criterion | 4-Prong | 6-Prong |
|---|---|---|
| Holding Security | Adequate for ≤1.40:1 | Superior for ≥1.40:1 |
| Rotation Resistance | Lower | Higher |
| Tip Protection | 2 prongs at tips | 2+ prongs at tips + belly |
| Stone Visibility | Maximum — less metal | Slightly reduced — more metal |
| Best L:W Range | 1.25:1–1.40:1 | 1.40:1–1.65:1 |
| Resizing Risk | Lower complexity | Slightly higher — more prongs to manage |
| Claw Prong Variant | Available | Available |
Claw prongs vs standard prongs for ovals: Claw prongs (sometimes called talon prongs) curve over the stone and grip the edge rather than pressing flat against it. For ovals, claw prongs at the tips provide excellent protection against chipping by distributing the claw's force over a slightly larger area of the tip facet. Claw prongs are the recommended tip prong style for elongated ovals; standard flat prongs are acceptable for compact and standard ratios.
Recommended settings by stone size and ratio:
| L:W Ratio | Setting | Metal | Price |
|---|---|---|---|
| 1.35:1–1.45:1 (Standard) | Pavé Halo 14K WG | 14K White Gold | $1,565 |
| 1.35:1–1.45:1 (Standard) | Pavé Halo 14K YG | 14K Yellow Gold | $1,565 |
| 1.40:1–1.55:1 (Standard-Elongated) | Pavé Halo Platinum | Platinum | $1,930 |
| 1.45:1–1.65:1 (Elongated) | The Ritz Oval Halo 14K WG | 14K White Gold | $2,995 |
For a complete guide to setting styles — including bezel, three-stone, and east-west orientations — see the oval diamond engagement ring settings guide.
Live Price Examples: Well-Proportioned 1ct Ovals
The following 1ct ovals are GIA certified on Blue Nile, available now, and represent ideal or near-ideal proportions. Verify the depth %, table %, and girdle on each certificate before purchasing — inventory changes daily.
| Grade | Price | Notes |
|---|---|---|
| G-VS2 | $2,887 | Entry-level ideal proportions at 1ct |
| F-VS2 | $3,114 | One colour step up, similar proportions target |
| G-VS1 | $3,272 | Better clarity, maintain proportions check |
| D-VS2 | $3,327 | Colourless, price premium for D grade |
| D-VS1 | $3,384 | Premium combination — verify proportions |
| E-VS1 | $3,589 | Near-colourless with excellent clarity |
Important: Price alone does not confirm ideal proportions. The G-VS2 at $2,887 may have better proportions than the E-VS1 at $3,589 — or worse. Check each stone's certificate individually. The price reflects colour and clarity; proportions are independent and not priced by the market.
How to Evaluate Oval Cut Quality Step by Step
Since GIA provides no oval cut grade, here is the exact process to evaluate an oval's cut quality on Blue Nile:
Step 1: Check depth % on the listing page. Blue Nile displays depth % prominently. Reject anything above 65% without opening the certificate.
Step 2: Calculate L:W ratio. Divide the listed length by width. Confirm it falls in your target range (1.35–1.50 for most buyers).
Step 3: Open the GIA certificate. Click "GIA Certificate" on the Blue Nile product page. Verify:
- Depth %: 58%–63%
- Table %: 53%–63%
- Girdle: Thin to Slightly Thick
- Culet: None or Pointed
- Symmetry: Very Good or Excellent
- Polish: Very Good or Excellent
Step 4: Watch the 360° video. Blue Nile provides 360° video for most loose diamonds. Look for:
- Even light return across the stone from tip to tip (no dark ends)
- Bowtie severity at the current L:W ratio (compare against the oval diamond bow tie guide severity thresholds)
- Belly symmetry — both long sides should curve evenly
Step 5: Filter by proportions, then by price. Use Blue Nile's advanced filters to set depth range (58–63%), then sort by price. This reveals all in-stock ovals with acceptable proportions at your target grades. Do not approach it the other way — filtering by price first and then hoping the proportions are acceptable.
Lab-Grown Oval Diamond Proportions: Same Rules Apply
Lab-grown oval diamonds follow identical proportions standards to natural ovals. The GIA certificate for a lab-grown oval lists the same measurements — depth %, table %, girdle, symmetry, polish — and the same ideal ranges apply: depth 58–63%, table 53–63%, girdle Thin to Slightly Thick.
The critical difference is price. A lab-grown 1ct G-VS2 oval runs approximately 70–80% less than a natural equivalent, which means the budget freed up can be redirected entirely to proportions selection. Lab-grown buyers can afford to be more selective — reject stones with 66% depth without budget guilt, knowing the next option is only a few hundred dollars away. For the full lab-grown oval comparison including price-per-mm analysis, see the lab-grown oval diamond guide.
The 6-prong recommendation applies equally to lab-grown ovals. The stone's physical dimensions and mechanical behaviour in a prong setting are identical regardless of origin — a 1.55:1 lab-grown oval benefits from 6-prong security for exactly the same reasons as a natural oval at that ratio.
Optimization Matrix: Oval Proportions by Goal
| Goal | Target Depth % | Target Table % | Target L:W | Prong Count |
|---|---|---|---|---|
| Maximum face-up size | 58%–60% | 55%–62% | 1.40:1–1.50:1 | 6-prong |
| Maximum brilliance | 60%–63% | 55%–62% | 1.35:1–1.45:1 | 4 or 6-prong |
| Finger elongation effect | 58%–62% | 53%–60% | 1.50:1–1.60:1 | 6-prong |
| Minimal bowtie risk | 60%–63% | 55%–63% | 1.30:1–1.40:1 | 4-prong |
| Compact/wide oval look | 60%–63% | 55%–63% | 1.25:1–1.35:1 | 4-prong |
| Balanced all-round | 59%–62% | 55%–62% | 1.38:1–1.48:1 | 4 or 6-prong |
| Budget-conscious (size value) | 58%–61% | 55%–63% | 1.40:1–1.50:1 | 4-prong |
Final Verdict
The best oval diamond ratio is 1.35:1–1.50:1 — but buying an oval with that ratio and ignoring depth is like choosing the right house in the wrong neighbourhood. The L:W ratio is the starting point, not the finish line. Depth percentage is the single biggest determinant of whether your oval's carat weight translates into visible size, and every oval above 65% depth carries The Proportions Penalty that no amount of colour or clarity upgrade can compensate for.
The practical process: set depth 58–63% as a non-negotiable first filter, calculate L:W ratio to your target aesthetic range, verify table 53–63% and girdle Thin to Slightly Thick on the certificate, watch the 360° video for bowtie, then choose the highest colour-clarity combination your budget allows. That sequence — proportions first, grades second — is the opposite of how most buyers approach oval diamonds and exactly the reason well-proportioned ovals exist at every price tier for buyers who know where to look.
Farzana's Verdict: Every oval engagement ring I have ever critiqued that the buyer was unhappy with had the same problem: they filtered by colour, clarity, and price and accepted whatever proportions came attached. The stones that make buyers say "it looks even bigger in person" have depth under 62%, L:W between 1.38:1 and 1.48:1, and symmetry Very Good or better. Those proportions are not rare or expensive — they are simply the ones you must filter for. The market does not sort ovals by cut quality. You have to do it yourself.
Frequently Asked Questions
What is the best L:W ratio for an oval diamond? The best L:W ratio for most buyers is 1.35:1 to 1.50:1. This range delivers the classic oval silhouette — clearly elongated, strong finger-lengthening effect, balanced face-up area — without the elevated bowtie risk that appears above 1.55:1. Within this range, the specific ratio is an aesthetic choice: closer to 1.35:1 for a wider oval, closer to 1.50:1 for more elongation.
What is the ideal depth percentage for an oval diamond? The ideal depth percentage for an oval diamond is 58%–63%. Below 55%, the stone may show windowing (you can see through the stone at the centre). Above 65%, the stone carries The Proportions Penalty — significant face-up area loss at the same carat weight. Reject ovals above 65% depth unless the actual mm dimensions confirm the face-up size you want.
What is the ideal table percentage for an oval diamond? The ideal table percentage for an oval diamond is 53%–63%. Within this range, the stone balances brightness and fire well. Below 50%, the table is too small and the stone appears to have less direct light return. Above 66%, the large flat table can create a glassy appearance from face-up.
Does GIA grade oval diamond cut quality? No. GIA's overall Cut grade applies only to standard round brilliant diamonds. For oval diamonds, GIA reports depth %, table %, girdle, culet, symmetry, and polish — but no single summary Cut grade. Buyers must evaluate oval cut quality manually by checking each of these measurements against ideal ranges.
What does "Ideal Cut" mean on Blue Nile for ovals? Blue Nile's "Ideal Cut" designation for oval diamonds is Blue Nile's own proprietary standard, not a GIA grade. It is based on Blue Nile's thresholds for depth, table, symmetry, and polish. It is a useful first filter but should not replace manual verification of the GIA certificate proportions for each individual stone.
How many prongs should an oval diamond have? For oval diamonds with L:W ratio below 1.35:1, 4 prongs are adequate. For L:W ratio 1.35:1–1.50:1, either 4 or 6 prongs work — 6 prongs offer better rotation resistance. For L:W ratio above 1.50:1, 6 prongs are strongly recommended due to the torque leverage created by the longer stone on the prong contact points.
What are claw prongs for oval diamonds? Claw prongs (also called talon prongs) have a curved tip that hooks over the diamond's edge rather than pressing flat against it. For oval diamonds, claw prongs at the tips provide extra protection against the long axis torque that elongated ovals experience. They are particularly recommended for ovals above 1.50:1 L:W where the tips are under the most mechanical stress.
How do I calculate L:W ratio from a GIA certificate? Divide the listed length by the listed width. For example, if the GIA certificate shows "9.12 × 6.54 × 3.94mm," the L:W ratio is 9.12 ÷ 6.54 = 1.39:1. GIA does not report L:W ratio directly — you calculate it from the measurements. Blue Nile's product pages do display the pre-calculated L:W ratio if you prefer.
Is a 1.5:1 oval ratio too elongated? Not inherently, but 1.50:1 is the threshold where bowtie risk increases meaningfully and where 6-prong settings become strongly recommended. A 1.50:1 oval from a skilled cutter with ideal depth (58–62%) and good symmetry can be beautiful with a mild bowtie. Evaluate the 360° video carefully. Above 1.55:1, bowtie evaluation is mandatory before purchase.
What symmetry grade should an oval diamond have? Very Good or Excellent symmetry is the minimum standard for oval diamonds. Poor symmetry in an oval is visible to the naked eye — an uneven belly, off-centre table, or asymmetric tips. Unlike round diamonds where minor symmetry issues are hidden by the circular shape, the oval's elongated silhouette amplifies any asymmetry. Good symmetry (one grade below Very Good) warrants careful video evaluation before purchase.
What girdle thickness is best for an oval diamond? Thin to Slightly Thick (reported as "Thin to Medium" in GIA terminology) is the ideal girdle range for oval diamonds. Extremely Thin girdles create chipping risk at the tips. Very Thick or Extremely Thick girdles add carat weight that contributes nothing to the face-up appearance — you pay for weight that is hidden in the setting.
How much does oval cut quality affect price? The market does not price oval cut quality the way it prices round cut quality. An oval with excellent proportions (depth 60%, table 58%, Very Good symmetry) is not automatically more expensive than a poorly proportioned oval (depth 68%, table 65%, Good symmetry) at the same colour and clarity grade. This means well-proportioned ovals are not premium-priced — they simply require the buyer to filter for them. This is the opportunity: ideal proportions are available at market prices in every colour-clarity tier.
See Also
- Oval Cut Diamond: Complete Buying Guide
- Oval Diamond Bow Tie Effect Guide
- Oval Diamond Size Chart & MM Dimensions
- Elongated Oval Diamond Ring Guide
- Oval Diamond Engagement Ring Settings
- Oval vs Marquise Diamond
- Oval vs Pear Diamond
- 1 Carat Oval Diamond Price Guide
- Round Diamond vs Oval Diamond
- Oval Diamond Halo Engagement Ring
Expert Verdict
Always audit the stone individually — no grade replaces seeing the actual diamond. The certificate tells you what to look for. Your eyes tell you whether to buy.
— Farzana Hasan, GIA Expert · DiamondCritics.com